Search My Creative Way

How to get a good blowout at home! Hot Tools One Step Blowout Product review. Before and After!

One Step Blowout! 
The Hot Tools One Step Blowout is a game changer! I've wanted to write this Hot Tools One Step Blowout product review since Christmas. I give it 4.5 out of 5 stars!
Blow Dryer Brush

I received this blow dryer brush and was instantly hooked! It's one of my favorite gifts that I use every third day; when I wash my hair. I could never go to bed with wet bun hair. The next morning my hair would take too long to detangle, blow dry and straighten, until now!

Gravity Defying Texas Themed Birthday Cake. Tips on how to DIY Pouring Dr. Pepper Over Cake.

 This Texas Themed Birthday cake is perfect for a true Texan! It includes her love for Dr. Pepper, Bluebonnets, and the Texas Flag.

Texas Cake

How to make a gravity defying Dr. Pepper Cake:

To achieve the illusion of Dr. Pepper being poured over the cake we need to have a structure inside the cake holding the coke can up. For years I used a metal wire, but for something that is light weight, like a coke can, I use a balloon stick. Glue the balloon stick upside down on your cake board, cover, and feed it through the cake. With this two tier cake, I placed the balloon stick on the top cake board. Think about where you want the pouring effect to go. I glued my balloon stick to the outside of the cake board, not the center. 

Become an Essential Worker today! Run with Favor!


Join Favor Delivery and start earning money today! 
You can become an essential worker, helping your community, and earning money!

What is Favor?
Favor is a Texas company who hires "runners", also know as "personal assistants", to deliver items to customers.

How to make a Candy Bouquet with Jolly Rancher. Tutorial

DIY Jolly Rancher Candy Bouquet


Candy Bouquets make wonderful gifts for any occasion. They are a great gift idea for Mother's Day, Father's Day, Teacher Gifts, Good Luck Gifts, and Get Well Soon Gifts. I've made candy bouquets for  kids birthday parties; as sweet centerpieces and unique candy party favors. 

Here's a step by step tutorial on how to make a jolly rancher candy bouquet and all the supplies you'll need. Almost, any individually wrapped candy will work.

How to make an Easter Tutu Basket. Cute Baby Girl Easter Basket Tutorial.

DIY Easter Tutu Basket Tutorial


Here's a step by step guide on how to make an Easter Tutu Basket. The perfect Easter Basket for a little girl!  I finally had time to create a new Easter Tutu Basket so I made this tutorial for you.

How to Make an Easter Wreath. 4 Easy DIY Wreath Ideas.

Here's 4 Easy, DIY, Easter Wreath Ideas.
DIY Easter Wreath


Just in time for Easter. Learn how to make these 4 cute wreaths ideas.

People hang wreaths for religious beliefs, they wear them as hair accessories in weddings, and many families use wreaths as household decorations for any season. Including baseball and football season.

Easy Crock Pot Chicken Ranch Tacos. 4 Ingredients.

Chicken Ranch Tacos


I kid you not, these are hands-down the best Chicken Ranch Tacos. Probably, the best tacos you can make and they are so simple. Only 4 ingredients! Then, set it and forget it! It doesn't get any easier than that.

I've been making 3 ingredient tacos for awhile, but last week I decided to add some Ranch and it took these tacos to the next level.


4 Ingredient Chicken Ranch Tacos...

DIY Avengers Dresser Tutorial {with pictures}

Decoupage Avengers Dresser


Like most kids, my son is a fan of the Avengers. So, when we needed to redo his dresser we decided on creating a decoupage Avengers dresser.

Decoupage is an easy way to create whatever style dresser you want. Since you can pick any paper or fabric for your decoupage project the possibilities are endless.


Let's Get Started!

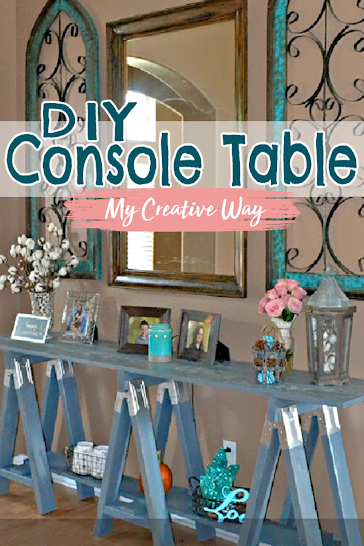
DIY Sawhorse Console Table

Sawhorse Entryway Table


Regardless, if you are looking for an entryway table, console table, or sofa table this Sawhorse table is the way to go. It is one of my favorite pieces in our new home and we have a sense of pride in building it ourselves, thanks to Shanty 2 Chic's Sawhorse Table Plans


We bought our wood and sawhorse brackets from The Home Depot.


You will also need:
Screws
Stain
Staining Sponge
Drill
Skilsaw

DIY Pallet Dog Bed for FREE

Dog Bed Out of Pallets


I couldn't take it anymore. Seeing that dang dog pillow on the floor drove me crazy, so the hubs and I decided to make a dog bed for the pillow. 

We were able to make this Pallet Dog Bed for $0!!! Yes! It was FREE! 

We had everything we needed to make this dog bed and you probably already have everything too!

Pallets: Ask the manager at a local store and most of the time they will let you take them off their hands. Everything else was in our garage including: screws, a sander, wood glue, stain, paint, stain sponge, a skilsaw, & drill. 

100 Melting Crayons. 100 Day of School Craft Idea

100 Melting Crayons


We are getting ready for the 100th Day of School and my son needs to bring 100 items to showcase. Jax and I went back and forth between 100 pennies, 100 cars, & 100 Lego's. We just couldn't decide. Then, Jax said "what about crayons?"

 DONE! Let's do this!


I'm obsessed with crafting with crayons. You may remember these crayon post from years ago...

Enough about the past! Lets get started on our 100th day of school crayon craft!


Supplies you will need:

Glue Glue:


#1. Mom or Dad, glue 50 crayons on the top of the poster board. 

#2. Glue 50 crayons on the bottom of the poster board. Have the tips of the crayons facing each other.

#3. With Scissors trim the poster board if needed. We had to cut almost half off.


#4. Stick your Washi Tape in the shape of  the number "100" on your board. The washi tape will fold when you bend it. It's really thin and easy to work with.


#5.  Use your blow dryer and start melting the crayons. Keep the heat only on the tip of the crayons and do not let the air blow around. It will splatter. Try to keep the blow dryer pointing down. Your kids will have a blast doing this. Your goal is to cover the washi tape.

Tip: Melted crayon is hard to get off surfaces, so go to the garage and find a place you don't mind getting messy. We used a plastic back drop and a piece of wood. Outside grass would be a great spot too.


#6. Once your washi tape is half way covered in crayon, flip your poster board over and melt the rest of the crayons. 

#7. When the crayons are melted and your washi tape is covered use the "cool" setting on your blow dryer.


Done with the blow dryer!


#8. Take off the washi tape. This took a little time, but we got it off! An older sister is great for this :)


Viola! Our 100 Melting Crayon Craft came out adorable! We added a name tag to the front in case his teacher decides to hang it up for awhile.


It's like he aged overnight! 

My daughter didn't have the chance to dress 100-years-old, so this was a fun project for Jax and I. Did you kids get to dress old on their 100th day of school?


Stay Connected with My Creative Way

DIY 3D Yorkie Cake

.Cakes by Raychel


It's been a few years since I created this 3d Yorkie Cake and it came across my timehop today. I just wanted to share it with my readers. 

This cake was a challenge. To say it was time consuming is an understatement, but the cakes you're most proud of are the ones which took the most time. 


The base of this "YORKIE" cake was white cake. It was a small cake, so I used two 6" rounds & two 4" rounds. I stacked them on top of each other and carved it out slightly. Then, I used rice krispie treats for the front legs and the head. Use a cake dowel to hold the head on the cake.

When you're covering it in fondant use a thick layer, then carve grooves into it making strands of hair. 

Here are some items I used creating this Yorkie Cake...


These cuties were my inspiration!


Stay Connected with My Creative Way

Rustic Texas String Art


HOME GIFT IDEA


Like most Texans, I'm proud to live in the lonestar state. This Texas String Art is the perfect way to show my Texan pride and I love the rustic feel of the stained wood and twine combined.

My brother and my new sister in law (3 weeks married)  made these as Christmas gifts for the siblings. We encouraged them to start their own Etsy page. 

You will have the option of stain color, string color, and state. It makes the perfect gift and it's one of the biggest string arts I've seen on Etsy. They take custom orders too. 


This Home State String Art looks great anywhere in your house. Next to the fire place or hanging above it.

Which state would you choose?

Don't forget to Pin!

Stay Connected with My Creative Way

Exposed Rainbow Cake. Sweet Friday.

Rainbow Cake Exposed!


If you're a huge lover of exposed cakes then you will love this beautiful Exposed Rainbow Cake. There is something so rustic and gorgeous about an exposed cake. I just love them.


I'm not a big fan of icing, so this is the perfect amount of sweetness for my sweet tooth. 


I used Ameri-Color Food Coloring in Red, Orange, Yellow, Leaf Green, blue, & Sky Blue. You can get your own pack here...
(click the picture)


If you have just one cake pan this may take awhile; it will be worth the wait.

DIY:
#1. Mix white (even yellow) cake mix with your Ameri-Color Food Coloring until it's blended. Put the colorful mixture into a cake pan and bake. Do the same thing for each color in the same sized cake pan. 

TIP: If your cake is cooked too golden for the beautiful colors to show use a serrated knife and cut around the cake edges. Freeze the cake for 15 minutes before doing so. This will create less crumbs as you're cutting. A better option is to find a large bowl big enough to use as a cutter. Like an over sized cookie cutter.

#2. Once your cake is cooled, ice the top with your favorite icing.

#3. Stack your colors in the order you would like. Press down firmly.

Tip: If your tall cake is too wobbly put it into the fridge. The stiffer the frosting the sturdier the cake.

#4. Place a long cake dowel inside the cake to keep it from falling over.

#5.  Create Sprinkles from crumbled cake pieces for the top of your rainbow cake.


DIY Rainbow Flag...


This rainbow flag is ribbon folded and glued over a cake dowel. Cut and heat seal the ends of the ribbon so it doesn't frey. Easy as pie (or should I say cake).


Save some of your batter from each cake color to make rainbow cupcakes. Just like these Camo Cupcakes my friend made a few years ago. Check them out!


Stay Connected with My Creative Way

Decoupage Snowman Hymns. Christmas Decor.

Snowman Hymns


When I saw these Decoupage Snowmen come across my Facebook newsfeed I just knew I had to share these with you. Are these not the cutest Christmas decorations you've seen? I'm obsessed!


I don't know all the details on how Ashley made these, but here is a behind the scenes picture.


  • cardboard (or wood) snowman cutout
  • your favorite hymn
  • antique it out
  • add your finishing touches: scarf, buttons, & decorated hat

If you would like more information on Ashley's Decoupage Snowmen please contact her HERE. She is one of the most creative people I know. Follow her to stay up to date on her latest creations. You will not be disappointed. 

So, what is your favorite Christmas Hymn? 


The First Nowell gets to me every time. 


Ashley, thank you for letting me share you creative way!


Stay Connected with My Creative Way